Getting Started
This guide walks you through building and training your first neural network in TensorBloom.
Download
Download the latest installer for your platform from the releases page.
| Platform | Format |
|---|---|
| Windows | .exe installer or .msi |
| Linux | .deb, .rpm, or .AppImage |
Requirement: Python 3.9+ must be installed. PyTorch is installed automatically on first launch.
Building from Source
If you prefer to build from source (for development or contributing):
git clone https://github.com/mdsunbeam/tensorbloom.git
cd tensorbloom/app
npm install
npx tauri dev
This requires Node.js 18+, Rust, and Python 3.9+. See the README for platform-specific prerequisites.
Your First Model
1. Open a Template
Go to Insert > From Template and select Simple MLP. This loads a 3-layer feedforward network for MNIST digit classification.
The graph shows the architecture:
- Data node provides MNIST images
- Flatten converts 28x28 images to 784-dimensional vectors
- Three Linear layers with ReLU activations and Dropout
- CrossEntropyLoss compares predictions against labels
2. Explore the Graph
- Click a node to see its parameters in the Properties panel
- Scroll to zoom, drag the canvas to pan
- Ctrl+L auto-layouts the graph
- The Code panel at the bottom shows the equivalent PyTorch code in real time
3. Train the Model
- Click the Training tab in the right panel
- The optimizer, learning rate, epochs, and loss function are pre-configured
- Click Start Training
- Watch the loss curve and accuracy in the Charts panel
- Training logs appear in the Logs panel
4. Save Your Project
Ctrl+S or File > Save Project saves a .tbloom file that preserves your entire graph, parameters, and training configuration.
Building from Scratch
Adding Layers
Three ways to add layers:
- Drag from the left panel — Browse categories (Linear, Convolution, Activation, etc.) and drag a layer onto the canvas
- Ctrl+K — Opens a spotlight search. Type “conv2d” or “relu” to find any layer instantly
- Drag from a handle — Drag from a node’s output handle onto empty canvas to open the layer picker with auto-connect
Connecting Layers
Drag from one node’s output handle (bottom) to another node’s input handle (top). TensorBloom validates connections and shows shape information on each edge.
Configuring Parameters
Click any node to edit its parameters in the Properties panel. For example, click a Conv2d node to set:
in_channels/out_channelskernel_size,stride,paddingbias,groups
Shape inference runs automatically — you’ll see the output shape update on the node as you change parameters.
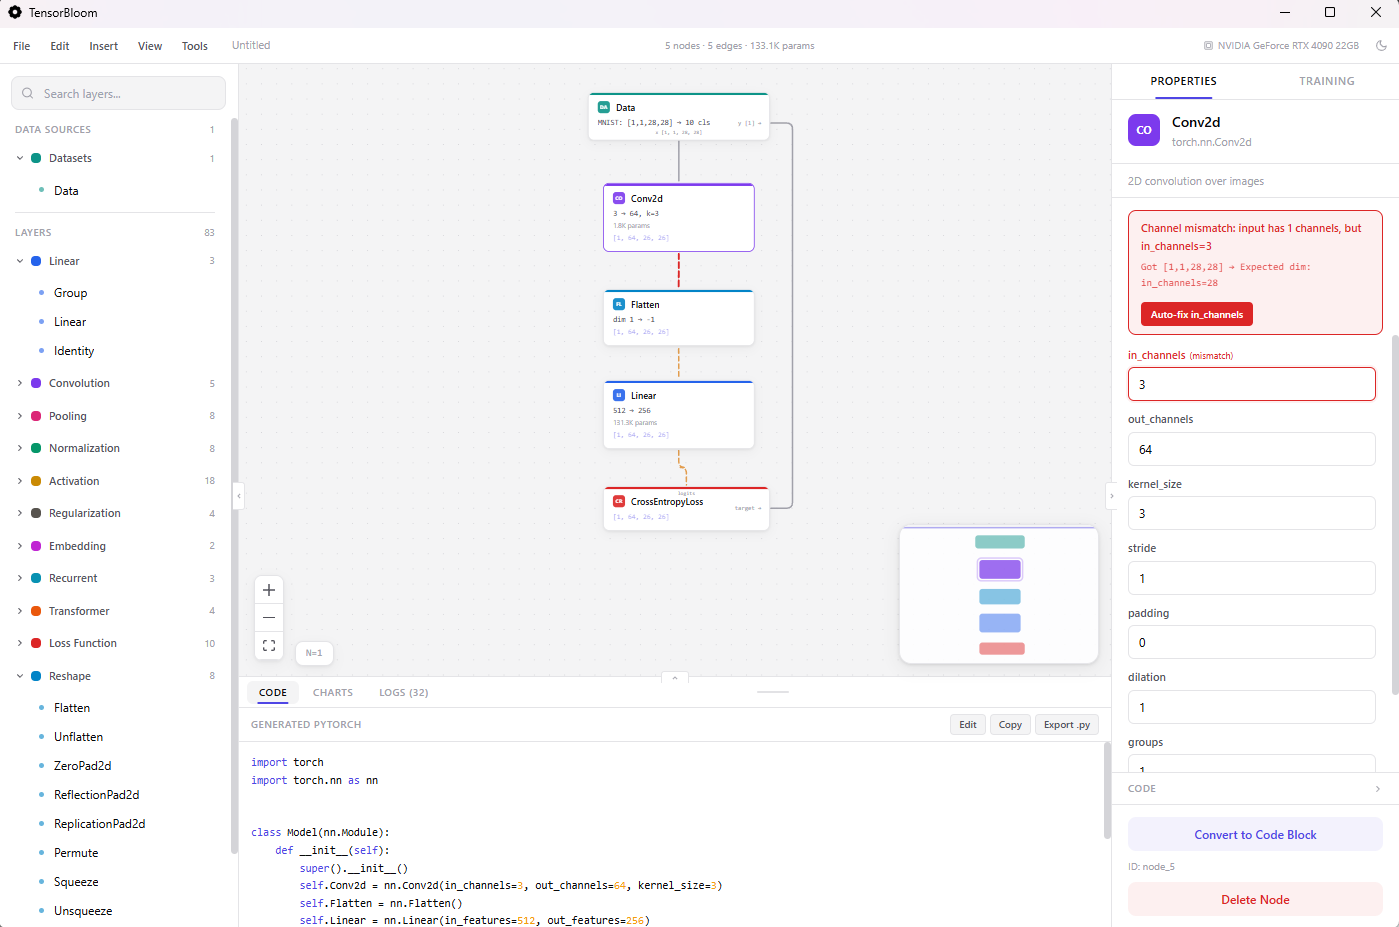
Shape Errors
If dimensions don’t match (e.g., a Linear layer expects 256 features but receives 512), TensorBloom shows:
- A red border on the mismatched node
- An error banner in the Properties panel with the exact mismatch
- When you click Start Training, the auto-fixer corrects fixable mismatches automatically
Using Templates
Press Ctrl+T or go to Insert > From Template to open the templates dialog. Choose from 16 pre-built architectures:
- Getting Started — Simple MLP
- Vision — LeNet-5, ResNet-18, ViT, MobileNetV2, U-Net
- Language — Transformer, nanoGPT, BERT, LSTM Text Classifier
- Audio — Whisper Encoder, WaveNet
- Generative — Autoencoder, Conv Autoencoder, Embedding Classifier
- Other — DenseNet Block
Select a template and it loads a complete, ready-to-train graph onto your canvas.
Using Custom Data
Built-in Datasets
Drop a Data node and select a preset: MNIST, CIFAR-10, TinyShakespeare, IMDB, SpeechCommands, and more. Everything is auto-configured.
Custom Tensor Files
- Drop a Data node, select Custom Tensors
- Browse or type a path to your
.pt,.npz, or.safetensorsfile - Click Scan Data to discover the tensors inside
- Assign roles: which tensor is the Model Input and which is the Loss Target
- Connect the Data node to your model and train
Your tensor file should be a dictionary of tensors saved with torch.save({"features": X, "labels": y}, "data.pt").
Copy, Paste & Grouping
- Ctrl+C / Ctrl+V — Copy and paste selected nodes (with edges between them preserved)
- Ctrl+D — Duplicate selected nodes in place
- Ctrl+G — Group selected nodes into a composite block. You’ll be prompted for a group name. The group collapses multiple nodes into a single reusable block.
- Ctrl+A — Select all nodes
Code Blocks
Any node can be converted to a code block for custom logic:
- Click a node and scroll down in Properties
- Click Convert to Code Block
- Write custom
__init__andforward()code - Add/remove input and output handles as needed
This is useful when the built-in modules don’t cover your needs — for example, custom attention mechanisms or specialized pooling. See the Code Blocks guide for details.
Auto-Save
TensorBloom auto-saves your project every 30 seconds to local storage. If the app closes unexpectedly, your work is restored automatically on the next launch. A toast notification confirms when a project is restored.
Exporting
Go to File > Export Model (or Ctrl+E) to export your trained model:
- ONNX — For deployment in production (TensorRT, ONNX Runtime, web)
- TorchScript — For PyTorch-native deployment (trace or script mode)
- Python code — Click
Export .pyin the Code panel for a standalone.pyfile
See the Export guide for details on trace vs script and limitations.
Keyboard Shortcuts
| Shortcut | Action |
|---|---|
Ctrl+K | Search and add any layer |
Ctrl+S | Save project |
Ctrl+Z / Ctrl+Y | Undo / Redo |
Ctrl+C / Ctrl+V | Copy / Paste |
Ctrl+D | Duplicate |
Ctrl+G | Group into block |
Ctrl+A | Select all |
Ctrl+L | Auto-layout graph |
Ctrl+B / Ctrl+. | Toggle panels |
Ctrl+M | Toggle minimap |
Ctrl+? | Show all shortcuts |
Delete | Delete selected nodes |
| Double-click | Rename node |